
Looking to embed Figma into a WordPress site? With the right expertise, it’s straightforward and even easier with professional assistance. Figma stands out as a popular design tool for creating interactive web and app interfaces.
By embedding your Figma designs directly into WordPress, you transform static presentations into dynamic, interactive experiences. This integration lets you share your latest designs with real-time updates, enhancing client and stakeholder interaction.
Whether you’re an experienced web developer or just starting out, embedding Figma into WordPress takes your design presentation to new heights. Let’s explore this step-by-step guide to get you started!
Understanding Figma and WordPress Integration
So, what exactly does it mean to embed Figma into WordPress?
Essentially, embedding is the act of placing your Figma design directly into a web page, allowing users to interact with it as if they were viewing it in Figma itself. This integration can transform your WordPress site into a live presentation tool, where updates reflect in real-time.
The benefits are clear: real-time design updates mean you don’t have to re-upload images whenever there’s a change. This leads to better client communication since they can see changes as they happen. Plus, it enhances project presentations by offering a more interactive and engaging experience.
Showcase Your Figma Designs on WordPress Effortlessly
Whether you decide to embed or convert, our team is here to assist you every step of the way. Get in touch with us today!
Preparing Your Figma Design for Embedding
Preparing your Figma design for embedding into a WordPress site involves a few crucial steps to ensure it looks great and performs well. First, review the layout of your design. It’s important that the design elements are organized in a way that translates seamlessly to a web display. This might mean adjusting the composition to accommodate different screen sizes and ensuring that interactive elements function as intended.
Next, consider the resolution and size of your design. Figma allows you to set specific pixel dimensions, so choose a size that looks crisp and clear on various devices without slowing down the load time on your site. You want your design to be high-resolution enough to look professional but not so large that it impacts performance.
Additionally, think about your audience’s experience when they view your embedded design. Make sure that any interactive features are intuitive and that the navigation within your prototype is user-friendly.
By focusing on these aspects, you’ll ensure that your embedded Figma designs not only look professional but also enhance the overall user experience on your WordPress website.
Read: Best Tips and Tricks for Figma to WordPress Conversion
Methods to Embed Figma Designs in WordPress
There are two primary methods to embed Figma designs into WordPress: using Figma’s embed feature and utilizing WordPress plugins. Let’s take a detailed look at both these methods.
Method 1: Using Figma’s Embed Feature
Figma’s embed feature is a user-friendly way to integrate your designs into a WordPress site. It allows you to maintain its interactive qualities.
Open Your Figma File
Begin by opening your design in Figma. Make sure your design is finalized and ready for sharing.
Generate Embed Code
Click on the “Share” button located at the top-right corner of the Figma interface. This button allows you to share your design with others. In the sharing options menu, look for the “Embed” option. Selecting this will open a new dialogue box.
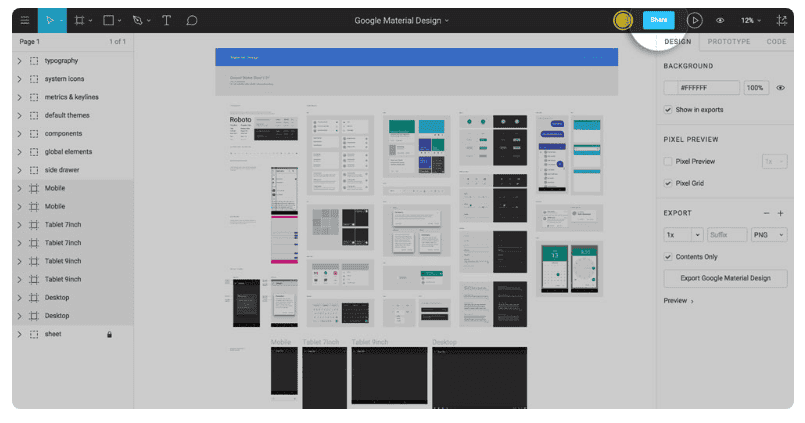
Here, you can customize the embed options, such as setting the dimensions of the embed frame and adjusting any other necessary settings to suit your website layout. Once satisfied with the settings, click to generate and copy the HTML embed code that Figma provides.
Integrate with WordPress
Now, head over to your WordPress site. Navigate to the specific post or page where you want the Figma design to appear. If you are using the Gutenberg editor, adding your embed code is straightforward. Click on the “Add Block” option within your page editor.
From the list of available blocks, select “Custom HTML” to create an HTML block. Paste the Figma embed code directly into this HTML block. This insertion ensures that the design appears exactly where you want it on your page.
Publish and Test
After pasting the code, preview your WordPress page to ensure the Figma design loads correctly and functions as expected. Ensure all interactive elements are operational and make any necessary adjustments if the design doesn’t display properly. Once you’re satisfied with how it looks and works, go ahead and publish the page.
By following these steps, you can seamlessly display your Figma designs on your WordPress site, making them interactive and alive. This method not only enhances the visual appeal but also enriches the user experience with real-time updates directly from Figma.
Find out: How to Design Brain-to-text Interfaces in Figma and Convert it to WordPress
Method 2: Utilizing WordPress Page Builder Plugins
Page builder plugins like Elementor or WPBakery can streamline the process of embedding Figma designs into your site. They offer added flexibility and control over presentation.
Choose Your Plugin
Both Elementor and WPBakery are popular for their intuitive drag-and-drop interfaces, which allow you to design pages without needing to code. Choose the page builder that you are most comfortable with or that best suits your site’s needs.
Insert Embed Code
Open the page or post in your WordPress editor where you plan to embed your Figma design.
In Elementor, simply drag an “HTML” widget to your chosen section on the page. For WPBakery, you can use the “Raw HTML” block.
Paste your Figma embed code into this block. These widgets and blocks are specifically designed to handle custom HTML or iframe embeds.
Adjust Styling and Responsiveness
Both Elementor and WPBakery provide a suite of tools for adjusting the look and feel of your embedded design. You can tweak the size, position, and other visual aspects of the embedded content. You can easily set custom width and height properties and adjust margins and padding to fit your site’s design.
Furthermore, both plugins offer responsive design features, which allow you to preview and adjust how your design will appear on different devices, such as tablets and smartphones. This ensures a consistent and optimized viewing experience for all users.
Enhance User Experience
These plugins often include additional features to enhance user interaction, such as applying animations or hover effects to make your design more engaging. You can also link custom triggers or interactions to make different elements of your Figma design respond dynamically when users interact with them.
Preview and Publish
Before finalizing any changes, use the preview feature these page builders provide to ensure that everything looks and functions as expected on your site. Once satisfied, publish the changes to make your interactive Figma design live on your WordPress site.
Learn: How to Create Figma to Elementor WordPress Template
Alternatives to Embedding Figma into WordPress Directly
If direct embedding isn’t suitable for your needs, there are alternative ways to showcase your Figma designs on a WordPress site. One such method is using static images derived from your Figma designs. Let’s delve into how you can leverage this approach:
Creating Static Images
Open your design in Figma and use the export feature to extract your designs as high-quality static images. Figma allows you to export in various formats, such as PNG, JPEG, or SVG, giving you flexibility based on your needs. To do this, select the specific frames or elements you wish to export and choose the desired file format and resolution settings. Consider using SVG for vector graphics that require scaling without quality loss.
Incorporating into WordPress
Upload these exported images directly to your WordPress media library. Then, you can insert them into posts or pages using the WordPress editor. Once uploaded, you can easily add these images to your site using image blocks, galleries, or sliders, effectively showcasing your designs.
Enhancing Static Image Presentation
Although static, you can enhance their presentation by using WordPress image optimization plugins to ensure they appear crisp and professional. Integrate these images into aesthetically pleasing layouts using WordPress design tools, creating engaging visual narratives even without real-time interactivity.
Advantages of Static Images
Unlike embeds that rely on external loading, static images are universally compatible across all devices and browsers, reducing the potential for display issues. Static images also typically load faster than embedded prototypes, especially on devices with limited processing power or slower internet connections. This can improve the overall user experience by reducing load times.
Limitations of Static Images
One primary drawback of using static images is the absence of interactive elements present in Figma designs. Users won’t be able to engage with your design the way they could with a live prototype. Also, unlike embedded content, static images won’t reflect real-time updates from your Figma project. Any changes in your design will require re-exporting and re-uploading the images.
Check out: Pros and Cons of Using Page Builders in Figma to WordPress Conversion
Styling and Customizing the Embedded Content
Customizing your embedded Figma content is essential to ensure it meshes well with the overall design of your WordPress site. Here’s how you can achieve a polished and harmonious presentation:
Adjusting Embed Options
When generating your Figma embed code, take advantage of the options available to customize the basic appearance. This includes setting the exact dimensions of the embed frame so that it fits naturally within your site’s layout. Choose options that match your design’s aspect ratio, ensuring that the embedded content is neither too large nor too small for its intended space.
Using CSS for Fine-Tuning
For more advanced customization, CSS provides powerful styling capabilities to refine your embedded content. You can adjust margins and padding to provide adequate spacing around the design, ensuring it doesn’t feel cramped or misaligned with other site elements. Modify borders to frame your design appropriately, or eliminate them for a more seamless look.
Responsive Design
Ensuring your embedded content is responsive is critical, especially when visitors are viewing your site on devices with various screen sizes. Use CSS media queries to adjust the size and layout of your Figma content based on the viewer’s screen dimensions. This helps keep your design accessible and attractive on desktops, tablets, and smartphones.
Integrating with Site Aesthetic
Coordinate the colors and typography of your embedded content with your site’s theme. This can include matching the background color of your embed or blending it with your site’s existing color palette to create a cohesive look. If your site uses specific fonts or text styles, you may need to integrate similar text treatments within your embedded content frame if possible.
Implementing Advanced Effects
Leverage CSS to add subtle effects such as animations or transitions when the embedded content appears on the screen. This can enhance user interaction and engagement by drawing attention to the design. Consider hover effects or shadowing to make the embedded element stand out without overpowering other site elements.
By focusing on these styling and customization techniques, you not only ensure that your Figma-embedded content looks integrated but also enhance the overall user experience.
Learn about: User-Centric Design: Figma User Testing for WordPress Websites
Conclusion
Integrating Figma into WordPress doesn’t have to be daunting. It’s a powerful way to showcase your projects with real-time interaction and updates. The dynamic nature of embedded Figma prototypes not only impresses but also improves design communication. Embedding your Figma designs into WordPress enriches your presentations and sets your work apart. So go ahead, experiment, and watch how your site’s interactivity transforms.
As you continue to enhance your design process, you’ll find that embedding is just one of many tools that bolster your creative output and client engagement. With this understanding and these techniques, you’re well on your way to creating a WordPress site that’s as vibrant and interactive as your Figma designs.


