Converting your Figma designs into the Gutenberg editor doesn’t have to be daunting. You can seamlessly bring your creative visions to life on a WordPress website with a few easy steps. This Figma to Gutenberg guide will walk you through the process, ensuring your designs retain their aesthetics and functionality.
Whether you’re a designer venturing into web development or a business owner aiming to enhance your site, these steps will simplify the transition. So, let’s dive in and transform your Figma mockups into an interactive WordPress site that captivates and engages your audience!
Figma and Gutenberg: A Quick Overview
Figma is a powerhouse of design with its intuitive interface and auto-layout capabilities. On the other hand, Gutenberg is the game-changing WordPress blocks editor that has redefined content creation.
The fusion of these two powerful platforms promises a web experience that’s both visually stunning and functionally superior. But what makes this conversion from Figma to Gutenberg significant for WordPress websites?
Imagine the possibilities when the meticulous design process in Figma meets Gutenberg’s flexible, block-based editing. You can translate exacting design specifications into a WordPress site that’s not only visually aligned with your creative vision but also optimized for performance and user experience, thanks to vector graphics.
This is where the magic happens: a seamless transfer of high-fidelity designs to a content management system (CMS) that powers over 43% of the web.
With the right tools and guidance, you can enhance your workflow, reduce development time, and deliver websites that stand out. Therefore, let’s explore the process of converting Figma designs to Gutenberg blocks.
Read more: Figma to WordPress Benefits
Don’t Have the Expertise for Figma to Gutenberg Conversion?
No worries! Our experienced team will ensure your design is perfectly replicated in WordPress, saving you time and effort.
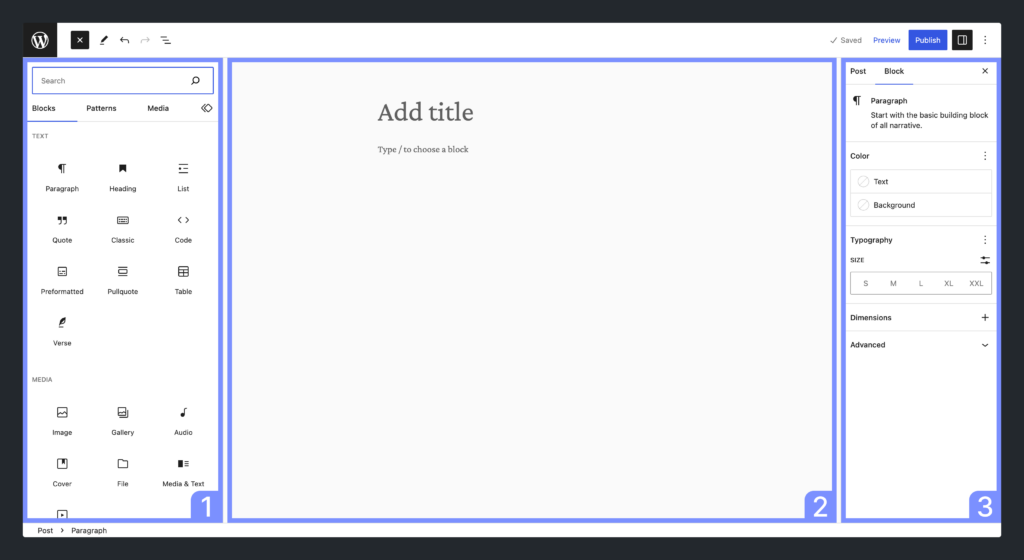
What Are Custom Gutenberg Blocks?
Custom Gutenberg blocks are a WordPress content management system feature that allows users to create unique, reusable blocks tailored to their specific content needs.
Since the introduction of the Gutenberg editor in WordPress 5.0, users can design content with a block-based approach, giving them more flexibility and control over the layout and presentation.
Custom blocks take this a step further, enabling WordPress developers to extend the functionality of the default blocks or build entirely new ones.
Understanding WordPress Gutenberg Blocks
To comprehend custom Gutenberg blocks, it is imperative to first understand standard Gutenberg blocks. These modular units compose the content within the editor, much like building blocks, allowing for intuitive content creation and layout structuring.
Why Create Custom Blocks?
While default blocks provide a wide range of functionalities, there are scenarios where specific requirements necessitate custom solutions. Here are some reasons to create custom blocks:
- Unique Design Needs: Custom blocks allow for unique design and formatting options tailored to specific branding or style requirements.
- Enhanced Functionality: Developers can add specific features or integrations that are not available in standard blocks.
Guide to: How to Create Gutenberg Blocks Based on Figma Designs
Steps for Creating Custom Gutenberg Blocks
Embarking on creating custom Gutenberg blocks involves several key steps:
- Setting Up the Development Environment: Install Node.js and npm to use tools like
create-guten-blockor@wordpress/scriptsfor block development.
- Defining Block Attributes: Plan the data that your block will handle. Attributes define the properties that are saved with the block and can be modified by users.
- Creating Block Structure and Styles: Develop the block’s visual components using JavaScript (typically React) and CSS to ensure it fits seamlessly into the site’s design.
- Registering the Block: Use the
registerBlockTypefunction provided by the WordPress Block Editor API to make the block available in the Gutenberg editor.
- Testing and Iteration: Test your block throughout the development process, ensuring compatibility and functionality. Iterate based on testing outcomes to refine the final product.
Benefits of Using Custom Blocks
Custom Gutenberg blocks offer several advantages:
- Reusable Components: Once created, custom blocks can be reused across different pages and posts, enhancing productivity and consistency.
- Tailored User Experience: They cater to specific user needs and improve the overall editing experience by simplifying complex tasks.
- Performance Optimization: By designing blocks specific to your requirements, you can optimize site speed and performance far beyond what generic solutions can offer.
Which Page Builder is Best: Elementor vs Gutenberg
Steps to Convert Figma to Gutenberg Blocks
From Figma’s initial preparation to WordPress’s final touches, we’ll carefully guide you through each step. So, let’s begin.
Step 1: Preparing Your Figma Design

Before you begin with the conversion process, it is crucial to have a well-prepared Figma design. Follow the guide below:
- Start by organizing your Figma file and ensure that all layers and components are clearly labeled. This organization will make the conversion process much smoother.
- Next, review the design for any elements that might be challenging to implement in Gutenberg. For complex elements, consider simplifying these elements.
- Lastly, export all assets, such as images and icons, in the appropriate formats and resolutions.
Additionally, make use of Figma’s built-in Dev Mode to inspect spacing, typography, and style properties. Dev Mode allows you to extract accurate CSS values, copy code snippets, and export assets efficiently. This ensures a smoother handoff to the developer. By following these preparation steps, you set the foundation for a seamless transition from design to WordPress.
Step 2: Setting Up Your WordPress Environment
Now, set up your WordPress environment.
- Install the latest version of WordPress and configure your development environment. Also, ensure that you have a good understanding of the Gutenberg editor, as this is where you will recreate your Figma design.
- Create a child theme (if necessary) to ensure that your customization is preserved even after theme updates.
Additionally, familiarize yourself with the block editor and the various default blocks available, as these will be the building blocks for your design.
Step 3: Converting Design Elements
Now it’s time to start converting your Figma design elements into Gutenberg blocks.
- Begin by breaking down your Figma design into sections and identify the corresponding Gutenberg blocks for each section.
- Use the built-in blocks for standard elements like paragraphs, headings, images, and buttons.
- You can also use the group block to combine multiple blocks into one cohesive section for more complex designs.
Furthermore, pay attention to the layout and spacing to ensure consistency with your Figma design.
Step 4: Customizing with Custom HTML/CSS
While Gutenberg provides a robust set of blocks, you might need additional customization to match your Figma design precisely. In this case:
- Use the custom HTML block to insert custom HTML code where necessary.
- Additionally, apply custom CSS to fine-tune the appearance of your blocks.
You can also add custom CSS directly to your theme’s stylesheet or use the Additional CSS section in the WordPress Customizer. This step allows you to achieve higher precision and ensure that your design is exactly replicated.
Step 5: Testing and Refining
Once you have recreated your design in Gutenberg, it is essential to test your site thoroughly.
- Check the layout and functionality across different devices and browsers to ensure responsiveness and compatibility.
- Test all interactive elements, such as links and forms, to ensure they work correctly.
Also, gather feedback from users or stakeholders and make necessary refinements. This iterative process helps to identify and fix any issues, ensuring a professional final product.
Suggestion: Use tools like Chrome DevTools or BrowserStack for cross-browser testing.
Learn: How to Migrate a Site from Figma to WordPress
Bonus: How to Integrate Advanced Features into Your Gutenberg Block from Figma?
Integrating advanced features into your Gutenberg block from Figma involves systematically transforming design elements into functional components within WordPress. By leveraging design assets from Figma, developers can enhance the interactivity and visual appeal of Gutenberg blocks, creating a dynamic and engaging user experience. Here’s how you can achieve this:
Step 1: Extracting Design Elements from Figma
The first step is extracting and organizing design elements. Figma allows you to export assets such as images, icons, and color palettes, which are crucial for reproducing the design in WordPress.
- Exporting Assets: Use Figma’s export function to download required design elements in appropriate formats (e.g., PNG, SVG).
- Organizing Assets: Ensure all exported assets are organized and easily accessible for the development phase.
Step 2: Setting Up Your Development Environment
The success of integrating advanced features depends significantly on your development environment. Preparing your setup ensures smooth import and implementation of design features.
- Install Required Tools: Have Node.js and npm installed, along with WordPress development tools like
@wordpress/scripts, which can streamline block development.
- Choose the Right Plugins: Depending on the feature set, integrate plugins that support animation, interactivity, or specific design functions.
Step 3: Translating Design to Code
Now, you’ll translate Figma’s visual design into functional code components. This involves using React, the JavaScript library underpinning Gutenberg, to build interactive elements.
- Developing Block Structure: Use React to create reusable components that represent the structure of your block, adhering to the layout showcased in Figma.
- Implementing Styles: Apply CSS (or SCSS for more complex styles) to reflect Figma’s design specifications accurately.
Step 4: Adding Interactive and Dynamic Features
To create a rich user experience, integrating interactivity and dynamic content enhances the functionality of the Gutenberg block.
- Using JavaScript for Interactivity: Incorporate JavaScript, perhaps with libraries like GSAP or Anime.js, to add interactive animations and effects.
- Connecting to APIs: If your design requires dynamic content, connect your block to external APIs to fetch and display real-time data.
Step 5: Testing and Optimization
Before finalizing the integration, thorough testing ensures that the block works seamlessly across different environments and devices.
- Cross-Browser Testing: Verify that the block functions and displays correctly in various browsers and devices for wide compatibility.
- Performance Optimization: Optimize code and asset loading times to ensure the block remains lightweight and responsive.
Wrapping Up
By following these steps, you can effectively convert your Figma designs into a WordPress site using the Gutenberg editor without the need for additional plugins.
Converting Figma design into dynamic blocks of Gutenberg is both attainable and rewarding. Simply put, with Gutenberg, you can turn Figma designs into fully responsive WordPress pages. The result? A seamless blend of creativity and functionality.
So, why wait? Start converting your Figma designs to Gutenberg today. And, if you need any help, reach out to us. Our team will be happy to assist you!
Figma to Gutenberg FAQs
Is it possible to convert Figma to WordPress?
Yes, it is possible to convert Figma designs to WordPress. This process typically involves using the design as a blueprint to code a custom WordPress theme. Developers can manually create HTML, CSS, and PHP files based on the design or use automated tools and plugins that aid in the conversion.
How do I switch to Gutenberg editor?
To switch to the Gutenberg editor in WordPress, ensure that you have WordPress 5.0 or the latest version, as it comes with the Gutenberg editor by default. If you are using the Classic WordPress Editor plugin, you may need to deactivate or uninstall it.
Does Figma have a WordPress plugin?
Figma does not have an official WordPress plugin. However, third-party tools and Figma plugins can help with the seamless integration of Figma designs into WordPress or assist in the conversion process.
How do I convert Figma to Elementor?
To convert Figma designs to Elementor, you need to manually recreate the design using Elementor’s drag-and-drop interface. Start by exporting assets like images and icons from Figma, and then replicate the layout by setting up sections, columns, and widgets in Elementor.
Do I need to organize my Figma design using Auto Layout before conversion?
While using Auto Layout in Figma is not mandatory, organizing your design with it can significantly streamline the conversion process. Auto Layout helps maintain consistent spacing and alignment. Thus, making it easier to translate the design into responsive Gutenberg blocks.
Can I integrate my existing marketing tools and analytics into the WordPress website?
Yes, you can. Your existing marketing tools and analytics can be integrated into your WordPress website. This includes tools like Google Analytics, Mailchimp, and various SEO plugins.
How do you handle images during the conversion process?
Images are carefully exported from Figma in appropriate formats and resolutions. They are then uploaded to the WordPress media library and inserted into the site using the Gutenberg image block. This ensures that they retain their quality and alignment as per the original design.
Is it possible to add custom HTML/CSS to my Gutenberg blocks?
Yes, Gutenberg allows for the addition of custom HTML and CSS. Specifically, you can use the Custom HTML block for HTML code. Furthermore, you can apply custom CSS either directly through the theme’s stylesheet or the Additional CSS section in the WordPress Customizer. This allows for precise customization of your design.