

If you design for both digital and print, you’ve probably encountered the challenge of converting pixels (px) from Figma to centimeters (cm) for print-friendly WordPress outputs. Pixels are great for screen design, but when it comes to printing, you need precise dimensions in centimeters to ensure high-quality prints. Understanding the digital or print designs conversion process will help you maintain design accuracy and avoid blurry or distorted print outputs. In this guide, we’ll explore the easiest way to convert px to cm and apply the correct dimensions for WordPress print outputs.
Why Convert Pixels to Centimeters?
When designing for digital screens, pixels (px) are the standard unit of measurement. Pixels determines the screen display images based on pixel density, known as PPI (Pixels Per Inch). However, when printing, measurements are based on cm (centimeters) or inches, and the resolution is determined by DPI (Dots Per Inch).
If you don’t convert pixels to centimeters correctly, your print materials might not look as expected. It might look blurry, too small, or stretched.
For instance, a website banner designed at 1200px width may not translate properly to print unless you determine its real-world size in centimeters. Let’s break down why this conversion is important.
- Screen vs Print Differences: Digital screens and printers work differently. Screens use pixels to display images, while printers use dots per inch (DPI). A design that looks crisp on a screen may not print well without proper scaling.
- Avoiding Print Quality Issues: If you print a high-PPI digital design without conversion, it may appear blurry or pixelated. A correct pixel-to-centimeter conversion ensures your prints maintain sharpness and clarity.
- Ensuring Accurate Dimensions: Print materials need specific physical dimensions. If your design is meant to be a 10cm x 15cm flyer, you need to calculate the right pixel dimensions to match your printer’s DPI setting.
- Maintaining Design Consistency: Converting pixels to centimeters ensures your design appears exactly as intended in print. This is especially important for brand consistency in brochures, posters, or packaging.
By understanding these differences and making the right pixel conversions, you can avoid printing mistakes and ensure your Figma designs are print-ready for WordPress outputs.
Also read: Mastering Px to Rem in Web Design
Step-by-Step Guide to Convert Px to Cm in Figma for WordPress Print Outputs
As mentioned above, to ensure your Figma designs print correctly from WordPress, you need to convert pixels to cm accurately. Follow these steps to maintain sharpness, correct dimensions, and print quality.
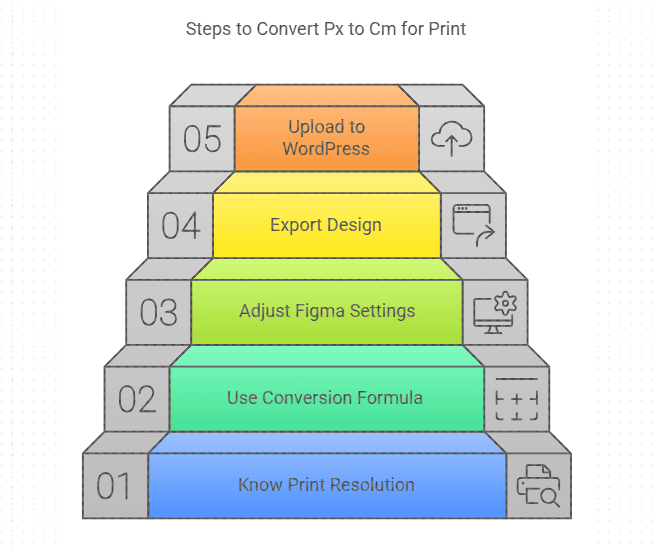
Step 1: Know Your Print Resolution (DPI)
Printers use DPI to define print quality. Common DPI values include:
- 72 DPI (Low-resolution screens, web images)
- 150 DPI (Good for standard printing)
- 300 DPI (High-quality print, best for brochures, posters)
To get accurate centimeter measurements, you need to consider the DPI setting of the printer.
Step 2: Use the Conversion Formula
The formula to convert pixels to centimeters is: Centimeters = (Pixels / DPI) × 2.54
Here’s an example: If your design in Figma is 1200px wide and the printer requires 300 DPI: (1200 / 300) × 2.54 = 10.16 cm
Thus, your design will be approximately 10.16 cm wide when printed.
Step 3: Adjust Your Figma Document Settings
To make designing for print easier, set up Figma accordingly:
- Open your Figma file.
- Go to Frame Settings (Press F for Frames).
- Set dimensions in pixels, keeping DPI in mind.
- Use grids and rulers to maintain proper proportions.
Step 4: Export Your Design for Print
Once your design is set:
- Export your file as PDF or High-Resolution PNG.
- Check the export settings in Figma to ensure 300 DPI for high-quality print outputs.
If necessary, open the file in Photoshop or Illustrator to double-check the print dimensions.
Step 5: Upload to WordPress for Print Output
Use a WordPress plugin like PrintFriendly to optimize your design for print. Ensure images are uploaded at the correct dimensions. Adjust CSS print styles to maintain layout consistency across print versions. Lastly, preview and test before finalizing.
Check out: Figma User Testing for WordPress Websites
Best Tools to Automate Px to Cm Conversion Table
Manually converting pixels to centimeters can be time-consuming, especially if you’re working on multiple designs. Fortunately, there are tools that can automate the conversion process, ensuring accuracy and saving time. These tools help you adjust your designs effortlessly for print-ready WordPress outputs.
- Online Px to Cm Converter: Websites like UnitConverters.net offer quick and easy pixel-to-centimeter conversions. Simply enter the pixel value and select the appropriate DPI (usually 300 DPI for print) to get the exact size in centimeters.
- Adobe Photoshop: If you prefer designing directly in centimeters, Adobe Photoshop is a great option. It allows you to set the document size in cm while keeping the resolution at 300 DPI for high-quality prints. This helps maintain design clarity when exporting your files for WordPress print outputs.
- Canva Pro: Canva Pro offers custom dimension settings, allowing you to switch between pixels, inches, and centimeters effortlessly. This is useful when creating print materials like flyers, posters, or business cards that need to be uploaded to WordPress.
- Print Preview Plugins for WordPress: Before publishing your design, you can use WordPress print preview plugins like Print Anywhere to check how your content will look when printed. These tools help adjust margins, resolution, and layout, preventing unwanted surprises.
By using these tools, you can streamline the conversion process, ensuring your Figma designs print perfectly from WordPress without any quality loss or misalignment.
Expert Picks: Best UI/UX Design Trends
Px to Cm Conversion: Common Mistakes to Avoid
When converting pixels to centimeters, small mistakes can lead to poor print quality, distorted designs, or incorrect sizing. To ensure your Figma designs print perfectly from WordPress, avoid these common errors.
- Ignoring DPI Settings: One of the biggest mistakes is not checking the DPI (Dots Per Inch) setting before printing. Digital screens typically use 72 PPI (Pixels Per Inch), while professional prints require 300 DPI. If you don’t adjust for this, your print may appear blurry or low-quality. Always ensure your design is set to the correct DPI before converting.
- Resizing Without Maintaining Aspect Ratio: When resizing an image from px to cm, you must maintain its aspect ratio to avoid distortion. Stretching an image without locking proportions can result in stretched or squashed graphics. In Figma, use the Shift key while resizing or enable the “Constrain Proportions” option to keep your design balanced.
- Using Low-Resolution Images: If your original image has a low resolution (low pixel count), converting it to cm won’t improve its quality. Printing a low-resolution image often results in pixelation—visible blocky artifacts that ruin the design. Always start with high-resolution graphics (300 DPI or higher) to maintain sharpness.
- Not Testing Print Output: Many designers skip the print test and only check designs on-screen. However, colors, margins, and sharpness can look different in print. Before finalizing, print a sample on the intended paper type to ensure everything appears as expected. Adjust any errors before publishing or distributing.
By avoiding these mistakes, you can ensure your Figma designs are print-ready for WordPress without compromising quality, clarity, or accuracy.
Know more: Common Pitfalls to Avoid for a Smooth Figma to WordPress Conversion
Final Thoughts
Converting Figma’s px to cm for WordPress print outputs ensures your designs look sharp and professional. By understanding DPI, using the right conversion formula, and leveraging the best tools, you can seamlessly transition from digital to print without losing quality. Take time to test, adjust, and optimize your prints for the best results. If you follow these steps, your print designs will be just as stunning as your digital images.
FAQs About PX to CM Conversion
What are pixels?
Pixel refers to the smallest unit of a digital image or display. It forms the building blocks of an image. More pixels result in higher image clarity and detail.
How do I change pixels to centimeters in Figma?
Figma doesn’t have a built-in cm unit, so you need to manually convert using the formula (px / DPI) × 2.54 and adjust your frame accordingly.
What DPI should I use for printing?
For standard prints, use 150 DPI. For high-quality prints like brochures, posters, or magazines, use 300 DPI.
What is the standard screen Resolution?
The standard screen resolution varies by device:
- 1920×1080 pixels (Full HD) – Common for most monitors and laptops.
- 1366×768 pixels – Found in older laptops.
- 3840×2160 pixels (4K UHD) – High-resolution displays.
Mobile devices have different resolutions, often with higher pixel densities.
Why do my prints look blurry even after conversion?
Blurry prints usually happen due to low DPI settings or poor image resolution. Always export your designs in 300 DPI for crisp quality.
Are there any cm converter online tools to automate px to cm conversion?
Yes, there are many cm converter tools like Photoshop, online converters, and Canva. These can simplify the process by allowing you to design directly in centimeters.
What are the PPI values in the metric system?
PPI (Pixels Per Inch) represents pixel density. Common values include:
- 72 PPI – Standard for web and screen designs.
- 300 PPI – Ideal for high-quality print outputs.
In the metric system, 1 inch = 2.54 cm, so:
- 300 PPI ≈ 118.11 pixels per cm
- 72 PPI ≈ 28.35 pixels per cm


