

Figma has become an essential designer tool, enabling seamless collaboration and efficient design workflows. Whether you’re working on a solo project or collaborating with a team, it’s crucial to enable edit access for the right people. Allowing someone edit access means they can directly modify files, making teamwork easier and more productive. This guide will walk you through the process of granting edit access on Figma, ensuring you and your team can work together effortlessly.
Why Grant Edit Access in Figma?
Collaboration is at the heart of any successful project. With Figma, designers and other stakeholders can work together in real-time, preventing bottlenecks and enhancing creativity. By allowing team members to edit a Figma file, you provide them the liberty to contribute actively, iterate on designs, and improve the overall outcome.

Granting edit access is particularly useful in scenarios where:
- A team jointly develops a design concept.
- Different team players need to implement feedback.
- Collective brainstorming sessions enhance the workflow.
- Quick iterations based on client feedback are necessary.
Each scenario benefits from real-time collaboration, which is enabled by granting others edit access.
Know more: Top Benefits of Using Figma for WordPress Web Design
Step-by-Step Guide: Grant Edit Access to Someone in Figma
Expanding this step-by-step guide will provide more detailed insights into each stage of the process, helping you to avoid common pitfalls and make the most of Figma’s sharing capabilities.
Step 1: Open Your Figma File
Accessing your Figma file is the first step toward sharing it with others. Whether you’re using Figma on a web browser or desktop application, the process is similar:
- Launch Figma: Start by launching Figma on your preferred platform—either via your web browser or by opening the desktop app on your computer.
- Locate Your File: Navigate through your dashboard to find the file or project you want to share. This might involve scrolling through your recent projects or using the search function to locate them quickly.
- Open the File: Click on the project name or the file itself to open it. Ensure that you’re opening the file you want to share and working on it collaboratively.
Learn about: Figma Design to Development Handoff
Step 2: Access the Share Settings
After opening your file, you’ll need to set up its sharing parameters:
- Find the “Share” Button: Look toward the top-right corner of the Figma interface. The “Share” button is typically represented by an icon resembling two nodes connected or a label that clearly says “Share.”
- Click to Open Sharing Dialog: By clicking on this button, you will open a dialog box that allows you to customize how and with whom you share the file. This is where you manage access and permissions.
Find out: How to Add or Edit a Logo in Figma
Step 3: Enter the User’s Details
Now it’s time to define who has access:

- Enter Email Addresses: In the sharing dialog box, you’ll find a field to input email addresses. Here, type in the addresses of those you wish to invite.
- Double-Check Accuracy: It’s crucial to ensure each email is entered accurately to prevent unauthorized access and ensure that each recipient gets their invitation. A simple typo could cause confusion or even a breach of privacy.
Expert Picks: Best UI/UX Design Trends
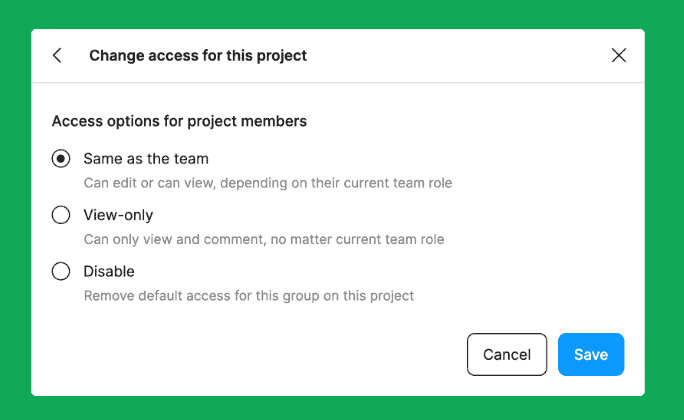
Step 4: Set Access Permissions
Setting the right level of access is crucial:

- Select Permission Level: Next to where you entered the email address, you’ll see a dropdown menu. Click this to reveal options and select “Can Edit” to grant editing privileges. This is distinct from view-only access, which restricts users to only viewing the document.
- Understand Permission Levels: The “Can Edit” option allows the user to view and actively engage with the document. It makes it easy for them to add changes and contributions and fully participate in the design process.
Check out: The Role of Atomic Design in Figma to WordPress Projects
Step 5: Send the Invitation
With permissions set, it’s time to invite your collaborators:
- Click “Send Invite”: After confirming the correct permissions, press the button to send out invitations. This action triggers an email notification to each recipient.
- Include a Personal Message (Optional): Sometimes, Figma allows you to include a message with the invitation. This can clarify the file’s purpose, deadlines, or tasks you want the person to focus on.
Step 6: Verify Access
Ensuring the invited person has access and can start participating is crucial:
- Confirm Receipt of Invitation: Check in with the recipient (s) to ensure they received the invitation email. Occasionally, it may end up in spam folders, so be sure they know to check there as well.
- Conduct a Quick Access Test: You can suggest a brief check-in where the invitee enters the file to confirm they have access. Encourage them to perform a simple edit or leave a comment, proving their permissions are correctly set.
- Engage in Real-Time Collaboration: If possible, arrange a brief collaborative session where everyone logs into the file simultaneously. This not only confirms their access but also boosts team synergy as everyone gets used to Figma’s real-time editing features together.
By following these detailed steps, you can smoothly manage and verify edit access in Figma, helping ensure productive collaboration on your design projects.
Know about: Impact of Color Theory in Figma to WordPress Conversions
Tips for Managing Edit Access in Figma
Effectively managing edit access in Figma is crucial for maintaining project integrity and ensuring a smooth workflow. By following these tips, you can safeguard your designs while fostering collaboration.
Review Permissions Regularly
Regularly reviewing permissions helps keep your design files secure and organized.
- Periodic Checks: Set intervals to review who has access to your files and make necessary updates.
- Update Permissions: Modify access rights based on changes in team roles or project requirements.
Limit Access When Necessary
Control who can edit to prevent unwanted alterations and protect your file’s data.
- Need-Based Access: Only grant edit access to those whose roles require it.
- Prevent Data Leaks: Restrict access to sensitive designs to minimize risk.
Educate Your Team
Educating your team about access levels and corresponding responsibilities fosters accountability.
- Clarify Access Levels: Make sure everyone knows their permissions within each file.
- Define Allowed Actions: Highlight what activities are permissible according to their access level.
Utilize Version History
Leveraging Figma’s version history feature allows you to monitor changes and restore previous states.
- Track Changes: Keep an eye on modifications by reviewing file history.
- Revert Changes: Return to prior versions when necessary to maintain design quality.
Assign Roles and Responsibilities
Defining roles and responsibilities streamlines workflow and improves team efficiency.
- Role Definition: Clearly outline who is responsible for specific parts of the design.
- Streamline Workflows: Use well-defined roles to coordinate and enhance team collaboration.
Also read: Why Brand Asset Management Software is Essential for Figma to WordPress Transformations
To Sum Up
Figma’s collaborative capabilities are a game-changer for design teams. By effectively managing edit access, you not only empower your team but also protect the integrity and progress of your projects. Ensure you follow the steps outlined above to allow your team to contribute freely and dynamically. With thoughtful permissions handling, your projects can achieve higher efficiency and creativity, paving the way for successful outcomes.
FAQs About Figma Edit Access
Can I revoke edit access from someone?
Yes, you can revoke access at any time. Simply follow the share settings procedure, find the user under current collaborators, and change their permission or remove them entirely.
Can I give someone view access only?
Absolutely. Figma allows you to set permissions to “Can View” if you want to restrict someone from editing the file.
Do I need a Figma account to edit a file?
Yes, anyone who needs to edit must have a registered Figma account. They will receive an email invitation to either sign up or log in.
Is edit access the same as admin access?
No, edit access lets users modify content, while admin access allows users to manage file settings, permissions, and other administrative tasks.
How can I track changes made by other editors?
Figma provides a version history feature that allows you to view and restore previous versions of the file to see what changes were made and by whom.


