
If you’re working with visuals, cropping is one of the most essential editing tasks. Whether you’re refining your mockups or adjusting images for better composition, knowing how to crop in Figma can significantly improve your design workflow.
Figma is a powerful design and prototyping tool that offers various cropping techniques that are efficient and easy to use. In this comprehensive guide, you’ll learn step-by-step how to crop images in Figma, explore different methods, and understand best practices to enhance your visuals.
Why Crop in Figma?
Figma makes image editing seamless, especially when it comes to cropping. Instead of switching to a separate photo editing tool, you can crop directly within Figma. This saves time and keeps your workflow uninterrupted.
Here’s why cropping in Figma is so useful:
- You can crop without leaving the tool.
- It’s non-destructive, so the original image stays intact.
- Cropping helps you control composition and focus.
- You can also quickly align images with frames, layouts, and UI components.
Importing Images into Figma
Before cropping, you need to bring your images into the platform. Fortunately, Figma supports multiple ways to import visuals.
How to Import Images in Figma
- Drag and Drop: Simply drag the image file from your computer onto the canvas.
- Copy and Paste: Copy an image from the web or your system and paste it into Figma.
- Use the File Menu: Go to the top menu and select File ⟶ Place Image.
Once imported, you can begin editing right away using the crop and mask tools.
Read: How to Create a Project Front Page Design with Figma
Cropping Basics: Figma’s Crop Tool
When it comes to basic image editing, Figma’s crop tool is your go-to feature. It’s intuitive, non-destructive, and designed to help you focus on the parts of an image that matter most. Whether you’re cleaning up a layout or zeroing in on a subject, cropping in Figma is quick and effective.
Understanding Non-Destructive Cropping
One of the best things about cropping in Figma is that it’s non-destructive. That means:
- The original image file is not altered.
- You can go back and adjust the crop area anytime.
- You won’t lose resolution or image quality.
This is especially helpful when iterating on designs or preparing different versions for testing.
Step-by-Step: How to Crop an Image in Figma
To begin the image cropping process in Figma, follow these simple steps:
- Select the Image: First, click on the image you want to crop. You can do this by directly selecting it on the canvas or through the layers panel if it’s behind other elements.
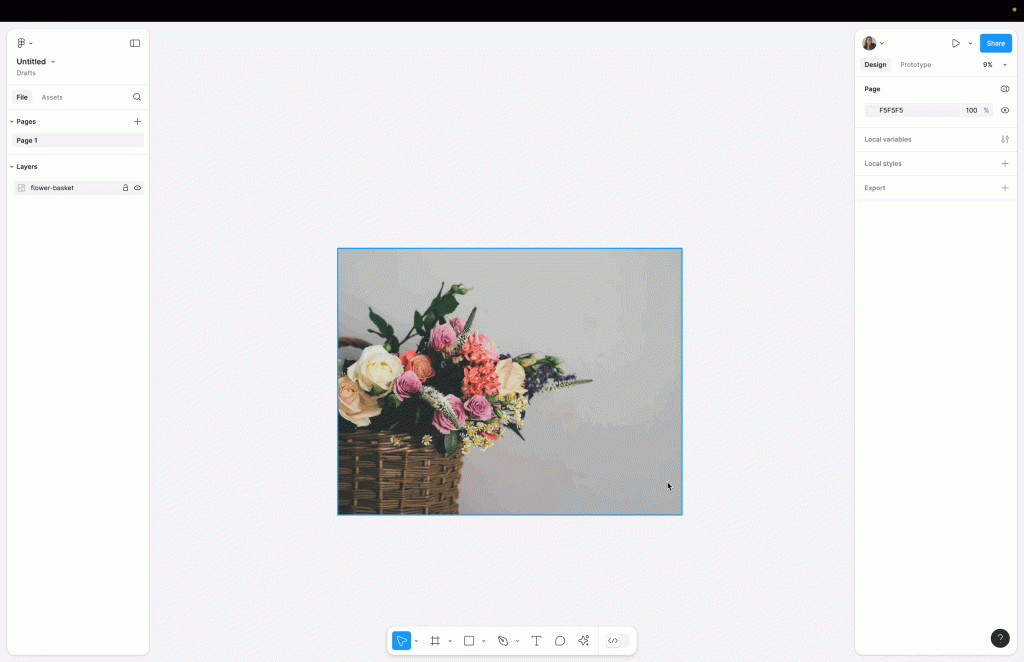
- Click the Crop Button: Next, head to the top toolbar and click the “Crop” icon. Alternatively, you can right-click the image and choose the Crop option from the context dropdown menu. This will immediately enable crop mode.
- Adjust the Crop Handles: Once you’re in crop mode, blue handles will appear around the image. You can now click and drag these handles to define the crop area. As you adjust the edges, Figma gives you a live preview of what will be visible.
Tip: For proportional cropping, hold the Shift key while dragging the corners. This ensures the aspect ratio stays consistent, which is particularly useful for responsive designs or UI elements.
- Confirm the Crop: After adjusting the crop area to your liking, press Enter on your keyboard or simply click anywhere outside the image. This action confirms and applies to the Final crop.
To quickly crop, you can double-click the image to select crop mode instantly. This Figma shortcut is a real time-saver, especially when working with multiple selected images in a tight design timeline.
Aspect Ratio and Proportional Cropping
Maintaining a consistent aspect ratio helps keep your designs visually balanced. Figma provides tools that make it easy to crop proportionally. Tips to maintain aspect ratio:
- Hold Shift while dragging the crop handles.
- Use the Opposing Handles: Resize from opposite sides to maintain balance.
- Use Guides and Grids: Enable layout grids to align cropped images perfectly.
These techniques help maintain design consistency across responsive layouts and screen sizes.
Shortcuts and Tricks for Efficient Cropping
Speed is critical when designing under tight deadlines. Here, Figma’s shortcuts and hidden tricks can help. These include:
- Double-Click to Crop: Opens crop mode instantly.
- Hold Shift: Maintains proportions while cropping.
- Right-Click Options: Access crop and mask directly.
- Use Layers and Frames: Organize and layer images for better control.
- Adjust Contrast: Make sure your cropped image stands out.
Using these shortcuts regularly can help you streamline your workflow.
Cross-Platform Cropping (Windows & Mac)
Figma works seamlessly across platforms. Whether you’re on Windows or Mac, cropping remains consistent.
- Mac: Use Cmd and Option keys for masks and crops.
- Windows: Use Ctrl and Alt for the same functions.
This consistency ensures you can collaborate with teams regardless of their operating system.
Common Cropping Use Cases in Figma
Here are some of the most common use cases where cropping plays a crucial role:
- Profile Images: When creating user avatars or team member sections, it’s common to crop images into circles. This is typically done using the masking technique with a circular shape layered over the image. It gives a clean, modern look that’s widely used in user interfaces and social platforms.
- Thumbnails: Whether you’re designing cards, galleries, or previews, thumbnails often need to maintain the same size and aspect ratio. Using frames allows you to crop and align images uniformly, helping you create a tidy layout and a professional visual flow.
- Hero Images: Hero images are central to visual storytelling for banners and landing pages. Cropping helps direct the viewer’s attention to key areas such as a product, a face, or text overlay space by trimming distractions and effectively framing the focal point.
- Mockups and Device Screens: In UI design and presentations, images often need to fit inside screens, browsers, or mobile device mockups. Cropping ensures proper alignment and helps simulate realistic views. This is often done by combining frames and masking to control image visibility within device containers.
- Social Media Templates: Different social platforms have different image size requirements. With Figma, you can resize and crop images to fit specific aspect ratios (like 1:1 for Instagram or 16:9 for YouTube). Using frames and maintaining aspect ratios ensures your visuals look polished across platforms.
Know more: AVIF vs WebP Image Format
Cropping Using Masking in Figma
While the basic crop tool is great for standard trimming, masking in Figma opens the door to more advanced and creative image cropping. This method is especially useful when you want to break away from basic rectangles and use custom shapes to create visually engaging layouts.
What is Masking?
In simple terms, masking allows you to define which part of an image is visible by using another object, typically a shape, as a frame. Everything outside the shape is hidden from view, but not deleted. This makes masking a non-destructive and flexible approach to cropping.
Masking is perfect for:
- Circular profile pictures
- Shaped thumbnails (e.g., stars, polygons, or icons)
- Creating layered and dynamic visual effects
- Enhancing UI elements with creative image containers
Unlike the basic crop tool, masking gives you more control and creative freedom to experiment with unique compositions.
How to Mask an Image in Figma?
Follow these steps to apply a mask in Figma:

- Place a Shape Over the Image: Start by creating a shape that will define the visible area of your image. You can use any shape from the shape tool, such as a rectangle, circle, polygon, or even a custom vector. Position the shape directly above the part of the image you want to display.
- Select Both the Shape and the Image: Next, select the shape and the image together. You can do this by holding down the Shift key and clicking both elements, or by dragging your rotate cursor to select them at once.
- Apply the Mask: Once both elements are selected, click the Mask icon in the top toolbar. Alternatively, you can use the shortcut: Ctrl + Alt + M on Windows and Cmd + Option + M on Mac. Figma will instantly apply the mask, cropping the image to match the boundaries of the shape.
- Adjust the Mask (Optional): If you need to tweak the composition, you can double-click the masked group. This allows you to reposition the image inside the mask or resize the shape itself without affecting the original image.
Why Use Masking?
Masking not only allows for greater design flexibility, but it also helps maintain consistency in layouts that require uniform shapes like user avatars, portfolio grids, or icon-based interfaces. Plus, since the masked image remains fully editable in the fill section, you can always adjust or replace the image without starting over.
Which Tool is Right for Your Team: Figma vs FigJam
Using Frames for Cropping in Figma
In addition to using the crop tool and masking, Figma allows you to crop images using frames. This technique is especially useful when working within design systems or responsive layouts, where consistent structure and alignment are key.
Unlike traditional cropping, frames act as containers that define the visible boundaries of any element placed inside, including images. While it may not be cropping in the strictest sense, using frames can produce similar results in a more flexible and design-friendly way.
Why Use Frames for Cropping?
Frames offer several advantages, especially when you’re designing at scale:
- Image Boundaries Are Constrained: When you place an image inside a frame, it becomes visually restricted to the frame’s dimensions. Anything outside the frame won’t be visible, effectively “cropping” the image.
- Non-Destructive and Reversible: Unlike raster-based cropping, the original image remains intact. You can move, resize, or reposition the image within the frame at any time without losing data.
- Perfect for Alignment: Frames make managing layouts, aligning elements, and maintaining consistency across components easier. This is particularly helpful when working with UI kits, design systems, or reusable components.
- Responsive-Friendly: Frames adapt well to responsive design needs. You can nest frames, use auto-layout, or set constraints to make sure your design scales gracefully across different screen sizes.
How to Crop an Image Using Frames?
Here’s a simple step-by-step guide to using frames for cropping:
- Create a Frame: Start by selecting the Frame Tool (F shortcut key) and drawing a frame on your canvas. You can set its size manually or use presets for specific devices or layouts.
- Insert the Image into the Frame: Drag and drop your image directly into the frame. Alternatively, you can copy and paste the image inside the frame or drag it from the layers panel.
- Adjust the Image or Frame as Needed: Once the image is inside, you have two options:
- Resize the Frame to crop more or less of the image.
- Move or Resize the Image within the frame to focus on a specific part.
You can also use the alignment tools or enable “Clip Content” (found in the right-hand design properties panel) to ensure that only the content inside the frame is visible.
When to Use Frames for Cropping
Using frames is ideal when:
- You need consistent image dimensions (e.g., in galleries or cards).
- You’re building components that include images.
- You want to keep your layout clean and structured.
- You need to apply auto-layout or constraints for responsiveness.
Frames give you a high level of control and are especially useful in professional design systems and team workflows.
Find Out: Is Figma Free for Your Design Needs
Best Practices for Cropping in Figma
Proper cropping enhances visual hierarchy, maintains image quality, and ensures that your designs stay consistent across devices and use cases. Below are key best practices to keep in mind:
Maintain Aspect Ratios
Always strive to preserve the original aspect ratio of an image unless a specific format is required. Stretching or distorting images can make your design look unprofessional and may reduce image clarity.
Tip: Hold the Shift key while resizing to maintain proportions. This is especially helpful when working with UI components or responsive layouts where consistency matters.
Use Layers Wisely
Figma is a layer-based design tool, and how you organize your layers can significantly impact your workflow.
- Group related images and elements together.
- Use frames and auto-layouts to contain and align content.
- Label layers clearly for easy navigation, especially in team projects.
This level of organization not only makes cropping easier but also improves overall design structure and collaboration.
Experiment with Masks
Don’t be afraid to get creative with masking techniques. Using custom shapes such as circles, polygons, or even logos as masks can bring a fresh and unique visual style to your work. Try experimenting with abstract shapes or branded elements to create custom crops that elevate your visual design beyond the standard rectangle.
Preview Frequently
Zooming in and out while working with cropped images helps you get a better sense of composition.
- Zoom out to check balance and alignment across your layout.
- Zoom in to ensure images are sharp, centered, and not cropped awkwardly.
Previewing your work regularly ensures your cropping choices make sense at every screen size and resolution.
Optimize for Load Time
Large image files can slow down Figma performance and, more importantly, affect load times in production environments. Before importing:
- Compress large image files using tools like TinyPNG or Squoosh.
- Stick to appropriate resolutions. Don’t upload unnecessarily high-res images for small components.
This practice not only speeds up your design process but also ensures smoother handoffs to developers.
Stay Consistent
Consistency is key in professional design. Use a style guide or predefined templates to ensure uniform image sizes, aspect ratios, and cropping styles across your project. For example:
- Keep avatar images consistently shaped (e.g., circular or square).
- Standardize hero image dimensions across all landing pages.
- Use component libraries to apply the same cropping logic throughout the product.
This makes your work more polished and helps maintain a strong brand identity.
Check out: How to Give Someone Edit Access on Figma
Advanced Cropping with Layers and Blending in Figma
Once you’re comfortable with basic cropping techniques, it’s time to level up your design workflow by exploring advanced cropping methods using Figma’s powerful layering and blending features.
These techniques can help you create rich, high-fidelity visuals that stand out and are perfect for presentations, UI mockups, and interactive prototypes. Let’s take a closer look at how you can make the most of these advanced tools.
Layering for Visual Depth
Figma allows you to stack and manipulate multiple images, giving your designs a sense of depth and dimension. By layering images creatively, you can simulate complex compositions or add visual storytelling to your design. Here’s how to get started:
- Combine Multiple Images in Layers: Start by importing two or more images onto your canvas. You can layer them on top of each other and adjust their positioning to build a composite look.
- Crop and Mask Each Layer Individually: Apply individual crops or masks to each image layer to control visibility. For example, mask a portrait with a circular shape, then overlay it with a textured background that’s cropped to a custom frame.
- Use Transparency and Blending Modes: Adjust the opacity of image layers or apply blending modes like Multiply, Screen, or Overlay. This allows you to create artistic effects, like soft fades, shadows, and light overlays, that add richness and realism to your design.
These techniques are especially useful when designing hero sections, banners, product mockups, or layered backgrounds.
Adjusting Within Frames for Interactivity
Cropping doesn’t stop at visuals; it also plays a big role in interaction design. When used inside frames, cropped elements can become part of interactive components and animated flows, taking your prototypes to the next level. Here’s how you can apply advanced cropping within frames:
- Crop Images Inside Interactive Components: Place cropped images within button components, carousels, or cards. These can be reused across your design system and adjusted without breaking the structure.
- Animate Cropped Elements with Prototypes: Use Figma’s prototyping tools to animate image states. For instance, a cropped image can expand on hover or slide into view on scroll. This adds depth and interactivity to your mockups.
- Use Auto-Layout for Consistency: Nest cropped images within auto-layout frames to maintain consistent padding, spacing, and alignment. This is especially effective when dealing with dynamic content or responsive layouts.
These advanced features enhance the visual quality of your design and improve usability and overall user experience.
Why Do These Techniques Matter?
Advanced cropping techniques may take a little more time to master, but they open up a world of creative possibilities:
- Build visually engaging user interfaces
- Create dynamic marketing visuals
- Produce interactive design prototypes that mimic real-world applications
By combining cropping with layers, masks, and blending, you’re not just editing an image; you’re crafting an experience.
Final Thoughts: Take Your Cropping Skills to the Next Level
Cropping in Figma is more than just trimming an image. It’s about composition, alignment, and visual storytelling. With tools like masking, frames, and smart handles, you can create designs that are not only beautiful but functional. The key is to practice. Try different cropping styles, use shortcuts, and challenge yourself with creative layouts.


